Since the first semester, I felt like learning more. I got more confident with the tools and how to use them. I developed a good relationship with my fellow students, and since I started working with them on projects, I became more aware of what I wanted to do with my projects.
I feel that the year at Middlesex University have been very educational in terms of what I want to pursue in life. I found out I had a great deal of Ideas when it comes to producing films, and I would love to be a cinematographer or director for a living! But I feel like I am only starting out.
I accidently broke my collarbone in April, and wasn't able to attend lectures for 6 weeks. I fell behind on the practical stuff, and I wan't able to do any productions in collaboration with the TVP students. But it forced me to take a break in my life. I feel like I have become more stressed rescently, because I am eager to pursue a careerer in film. It is my goal to produce short films and apply for the Danish film academy as a Cinematographer. When I reach my goal, I will truly know that my year in London was well spend, and maybe I will get a chance to work together with my friends again some day.
Thank you for a good year Middlesex University, I will miss you...
Brian
Friday, 30 May 2014
Monday, 5 May 2014
Long take exercise - A Place To Hide
For our final project of my studies in London, we had to create a short film including a 90 - 120 second long take.
A long take shot is both difficult and rare to master perfectly. But throughout the history of film, the long take have been mastered. Like in this scene from the David Fincher movie Panic Room:
For our Long Take, we decided to create a story about a girl who gets kidnapped on her birthday. We wanted to create a long take where the girl gets kidnapped and transported to another place, showing what was going on inside the van she was being kidnapped in.
On the day we had a lot of problems. The actors who was suppossed to turn up didn't show, and we couldn't get in contact with them! This delayed our shoot with 6 hours. We were planning on shooting during the day, but since none of our actors showed up, we had to think in alternatives. We ended up creating a story about a homeless girl, who had moved into a random flat and were living there, but had to hide from the real tennants.
We decided to shoot on a Canon EOS 7D and a hacked Canon EOS 50D with RAW capabilities. The film was shot on a variety of lenses, ranging in the wide-angle specrtum, since we were shooting it on super35 sensor sized dSLR cameras. We had both a slider and a rig to create a steady and easy shot.
My role on the day was director, as I couldn't operate a camera because of my broken collarbone. We had to move fast on the day, since we got started late at night, and didn't want to disturb more than necessary. I found that I liked the directing role - It was pleasant to have the big overview of the shot, while the team was creating the good shots.
The post production was what took the most of my time. The tutorials with Danny had prepared me for DaVinci Resolve, and I did my best to try and create a pleasant mood right until the moment the tenants come home. At that moment, the grading changes to a more pale, less saturated mood, and the film shifts into a tense mode. We failed the sound on the actual long take, since we were recording on a zoom h4n placed in the middle of the kitchen, hidden under the table so it wouldn't be seen in the shot.
All in all I learned a great deal of things working with my team on this film. For us it was important to keep on schedule, and make quick but constructive and good decisions on the spot!
The film can be seen here:
A long take shot is both difficult and rare to master perfectly. But throughout the history of film, the long take have been mastered. Like in this scene from the David Fincher movie Panic Room:
'
For our Long Take, we decided to create a story about a girl who gets kidnapped on her birthday. We wanted to create a long take where the girl gets kidnapped and transported to another place, showing what was going on inside the van she was being kidnapped in.
On the day we had a lot of problems. The actors who was suppossed to turn up didn't show, and we couldn't get in contact with them! This delayed our shoot with 6 hours. We were planning on shooting during the day, but since none of our actors showed up, we had to think in alternatives. We ended up creating a story about a homeless girl, who had moved into a random flat and were living there, but had to hide from the real tennants.
We decided to shoot on a Canon EOS 7D and a hacked Canon EOS 50D with RAW capabilities. The film was shot on a variety of lenses, ranging in the wide-angle specrtum, since we were shooting it on super35 sensor sized dSLR cameras. We had both a slider and a rig to create a steady and easy shot.
My role on the day was director, as I couldn't operate a camera because of my broken collarbone. We had to move fast on the day, since we got started late at night, and didn't want to disturb more than necessary. I found that I liked the directing role - It was pleasant to have the big overview of the shot, while the team was creating the good shots.
The post production was what took the most of my time. The tutorials with Danny had prepared me for DaVinci Resolve, and I did my best to try and create a pleasant mood right until the moment the tenants come home. At that moment, the grading changes to a more pale, less saturated mood, and the film shifts into a tense mode. We failed the sound on the actual long take, since we were recording on a zoom h4n placed in the middle of the kitchen, hidden under the table so it wouldn't be seen in the shot.
All in all I learned a great deal of things working with my team on this film. For us it was important to keep on schedule, and make quick but constructive and good decisions on the spot!
The film can be seen here:
Tuesday, 29 April 2014
The Avid Exercises - Post-Production 101
For the post-production course we were required to learn how to edit with Avid Media Composer 5, which is the post-production industry standard NLE for professional video and film editing. We were working in pairs on the assignments, but during my hospital stay I couldn't do all the assignments in pairs. Through the course we were taught how to import and export, do basic editing and even make animation in the footage from rough cut to fine edit. This course also included basic colour grading in DaVinci resolve, and sound editing in Avid Pro Tools. Through these exercises I have developed a skill set, that will be useful if I decide to pursue a career in cutting, sound editing or colour grading. Either way, I have now learned the basic skills to produce a good post-production result in the future.
When I was introduced to Avid Media Composer, I had been working in Adobe Premiere Pro and Adobe After Effects, so I had a general understanding of the NLE system I was being introduced to. But I found the layout of Avid Media Composer to confuse me at first. I was something different from what I had been used to, but after some practice I had a good understanding of how to use it. I understand why it is an industry standard, since a lot of the functions in the programme is controlled with keys or short-cuts, which makes the editing process faster and more reliable.
To fully understand Avid Media Composer, I felt like I had to start over again in tearms of editing. It is completely different to work in a highly professional editor, and along the way I felt like the progress started paying off. To this day I still do all my editing in Premiere pro, since I am almost 100% familiar with it's limitations and possibilities, plus it is a great tool to use as an independent film maker. I would definitively pursue a more advanced skill set for Avid Media Composer, if I were to work in a professional environment.
I think it would be a good idea to explore Avid Media Composer to its full potential, but I believe a good edit can also be achieved with other NLE systems. As Thompson and Bowen suggests:
Trauma Room:
Car Theft:
Gaffers Delight:
For this exercise brief I was not present in the classroom. This assignment was given to us as I was healing from a broken collarbone. I was told I had to make the sound flow smoothly, and perfect the cut the best I had learned. So when I felt a little better, I decided that I could probably manage this with the use of mostly one arm. It turned out to be okay, and I put a lot of thought into the intensity in the end, and how to cut so it seemed natural. I wanted to underline the romance the best I had learned, and decided to focus on the eye contact between the two characters, and a slow cutting rhythm towards the end of the clip.
In the edits it is clear to see how I have progressed as an editor while I did my post-production classes.
The edit files can be found here:
https://dl.dropboxusercontent.com/u/11934314/Avid%20Edit%20Files.zip
Sources:
When I was introduced to Avid Media Composer, I had been working in Adobe Premiere Pro and Adobe After Effects, so I had a general understanding of the NLE system I was being introduced to. But I found the layout of Avid Media Composer to confuse me at first. I was something different from what I had been used to, but after some practice I had a good understanding of how to use it. I understand why it is an industry standard, since a lot of the functions in the programme is controlled with keys or short-cuts, which makes the editing process faster and more reliable.
To fully understand Avid Media Composer, I felt like I had to start over again in tearms of editing. It is completely different to work in a highly professional editor, and along the way I felt like the progress started paying off. To this day I still do all my editing in Premiere pro, since I am almost 100% familiar with it's limitations and possibilities, plus it is a great tool to use as an independent film maker. I would definitively pursue a more advanced skill set for Avid Media Composer, if I were to work in a professional environment.
I think it would be a good idea to explore Avid Media Composer to its full potential, but I believe a good edit can also be achieved with other NLE systems. As Thompson and Bowen suggests:
"Other factors involved with editorial and transition choices include your own creativity,
the vision of the director, the suggestions of a producer, and the quality of the raw foot-
age that you are tasked with editing together."
(Thompson et al., 2009)
Trauma Room:
The Trauma Room exercise was the first Avid Media Composer exercise we had to do. The exercise allowed us to become more familiar with the layout and functions of Avid Media Composer, and was a good exercise to practice getting better. The meaning of my edit here is to create a tension with a fast cutting rhythm, to intensify the situation at the hospital.
The second exercise was the Car Theft exercise. This one alloed us to become familiar with the skill set of a professional TV editor. We were given a lot of rushes - meaning raw clips, to cut and edit as we thought it fit the edit. This exercise was longer than the first one, as this one not only taught us proper sound edit, but also how to put animation on to a freeze frame, much like a real TV presentation.
For this exercise brief I was not present in the classroom. This assignment was given to us as I was healing from a broken collarbone. I was told I had to make the sound flow smoothly, and perfect the cut the best I had learned. So when I felt a little better, I decided that I could probably manage this with the use of mostly one arm. It turned out to be okay, and I put a lot of thought into the intensity in the end, and how to cut so it seemed natural. I wanted to underline the romance the best I had learned, and decided to focus on the eye contact between the two characters, and a slow cutting rhythm towards the end of the clip.
In the edits it is clear to see how I have progressed as an editor while I did my post-production classes.
The edit files can be found here:
https://dl.dropboxusercontent.com/u/11934314/Avid%20Edit%20Files.zip
Sources:
Thompson, R. (2009). Grammar of the shot. 2nd ed. ed. Focal Press. Amsterdam ; Boston.
Monday, 24 March 2014
Field Lighting Exercise
As a part of the second semester, we had to do a Field Lighting Exercise. I teamed up with a bunch of very skilled guys - Danny, Liam and Jowayne. All of the guys brought something special into the shot. We were given the assignment to recreate a scene from Memento. Memeno as a film is very complex in the way it is lid. It has got hard shadows, and a very hight contrast. All the flashback scenes are shot in black and white, but my group and me decided that it would be a challenge to try and recreate this scenario.
The shoot was done with Dedolights and a Blackmagic Cinema Camera we were fortunate enough to borrow from a third year student. We started by tearing the scene apart piece for piece to analyse what kind of shots we were eventually going to reproduce, and then smaking a list over the different shots afterwards. It turned out to be a good idea, since moving the camera around a lot would have caused a lot of repositioning with the lights and the camera.
We were fortunate enough to have an actor on set, that had done a bit of acting before, and it took the shoot to a higher level. The took turns in setting up the lights and shooting the scenes, but mainly Liam was in charge of the camera, and I in charge of the lights.
Along the way we encountered trouble, as the medium we shot on wasn't formatted correctly, which caused all our hard work to go to waste. Fortunately enough, Danny was able to stitch together the pieces we had, and smooth them out.
In retrospect, I think we should have shot the whole thing in ProRes 422 instead of RAW. ProRes is easier on the SSD drive it records to, and therefore we might have had some uasble footage.
The final result can be seen here:
Tuesday, 11 March 2014
Evaluation of Skills for a post-production careerer
Through the various lectures we had throughout the year (minus the ones I missed because of my collarbone fracture) I learned a lot of skills on how to approach the industry professionally.
First of all, I got a lot better at video editing through awareness of the various methods used to create a specific feel and look in a film. Fast cutting rhythm, slow cutting rhythm, pace, cut selection and many other skills contributed to my knowledge and future careerer. I got a look into the industry through the program Avid Media Composer, and I got more aware of what is important as an editor. Among these skills are awareness of codec and its use. Online/ Offline editing and colour grading.
In the year I studied at Middlesex University, I expanded my cinematic view. But most significantly on the subject of colour. I slowly became aware of the green tint in the fluorescent lights, daylight/ tungsten temperature lights importance in a shot and how to recreate a specific feeling through specific use of colour.
I slowly became more confident with what I do and how I want to do it in terms of both production and post-production, and I feel like I can go out and make a film almost on my own. I would have the skills to fill in a lot of the roles, but in my year I also learned the importance of a good and efficient team.
Now more than ever I know my limitations and possibilities. I found out that I was very impatient on a set. If the production didn't constantly moved on, I became annoyed and bored. I need things to happen while in the moment. I find this way of working highly efficient, and I will in the future do my best to find the good spot, to where I can be productive but also have fun.
Sunday, 2 March 2014
Colour Concept: A Single Man

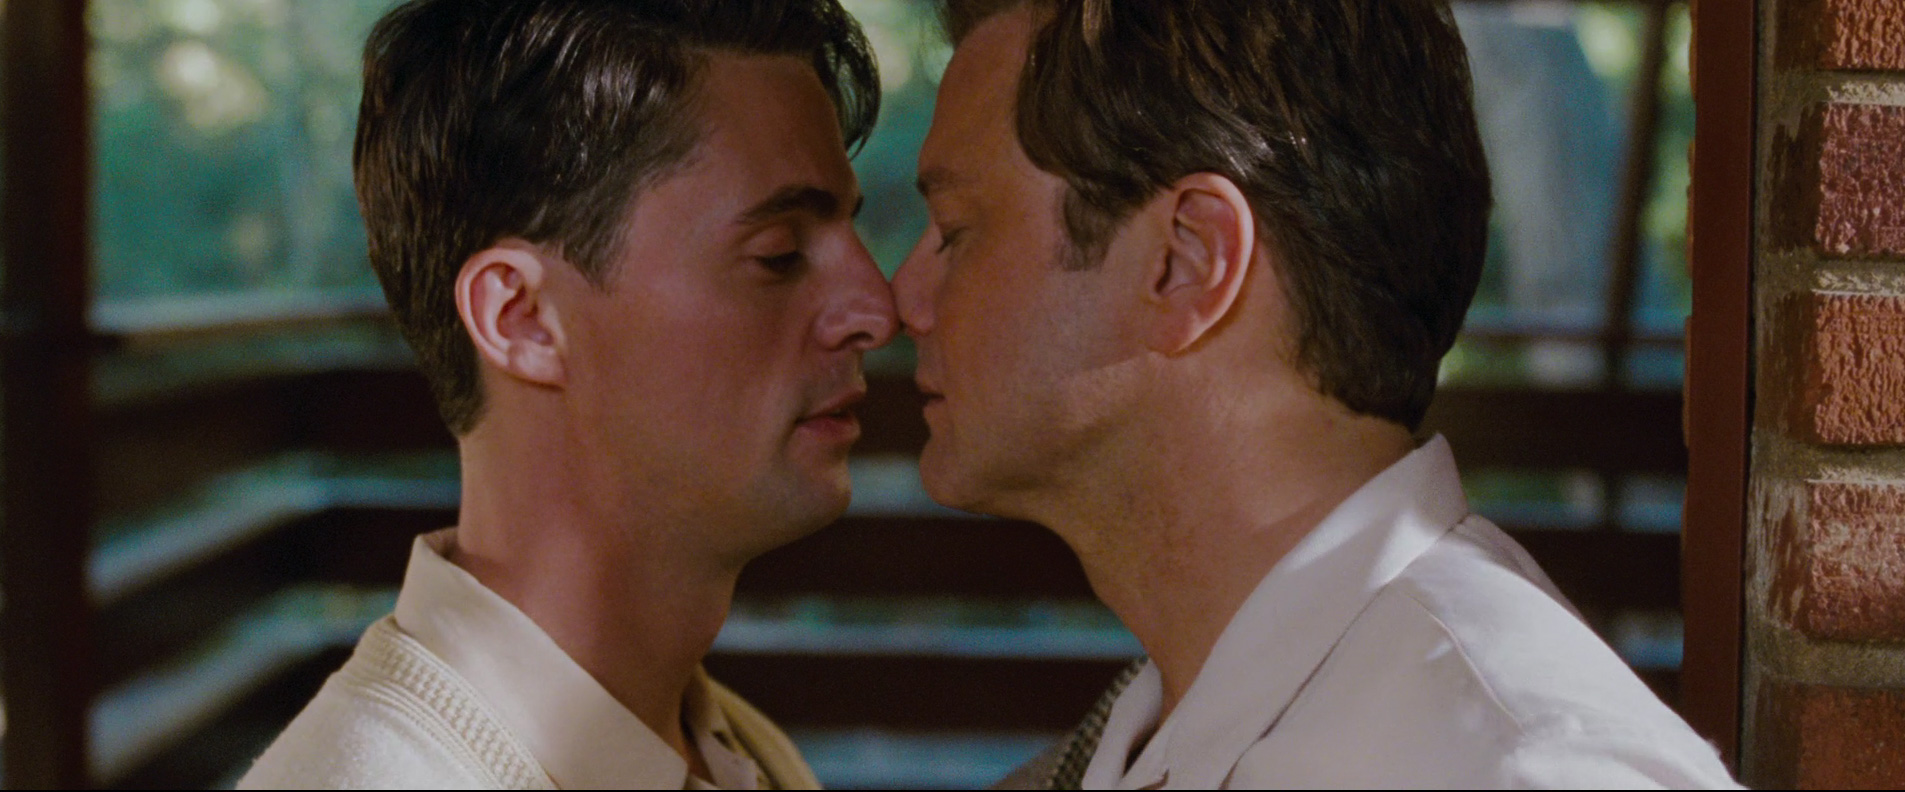
I have chosen to look at the colours in the film "A Single Man" from 2009. In this film the main character George, played by Colin Firth, is a homosexual middle-aged professor, who lost his love in a car accident.
There is a distinct 60's feeling about the whole film. Not only because of the clothes, but because of the colours and grain of the film. The whole film is very pleasing to the eye, and all the details and distinct colours bring the film up to a very high level of professionalism.
The colours are very important for this film, as they are what makes the film work. Everything is seen through the eyes of George, and his character influences the colours throughout the film.

The film is graded in a low saturated and medium/high contrast style, as we are presented to George's world. The low saturation is meant as a state of depression for George, as he plans to take his own life prior to the accident that killed his lover.
As the film progresses, we are taken back in time in several flashbacks to when George and his lover was still together. The saturation in high, the skin-tones warm, and the whole image is very pleasing to the eye. In contrast to the main shots in the film, we clearly see George as a happy man in the flashbacks.

A very noticeable shot is the flashback scene, in where George and his lover are on the beach. The scene is shot in black and white as the only on of it's type in the film. There is a hard shadow on George's lover, indicating that the memory is fading or something terrible is about to happen to him.

George finds comfort and love in one of his students - the young Kenny. Kenny is the sweet young student, with a deep fascination for George. As Kenny enter the stage, the colour grading changes. From the cold and low saturated state to the saturated and pleasant state.
Whenever saturation is introduces into the image, the viewer will perceive it as a sign of George's well being improves. A little colour is painted on his tragic life.
Wednesday, 26 February 2014
Colour Grading Workflow
Colour grading is an important step, and usually one of the final steps before the film is completed. Since the digitalization of film, colour correction have become easier to access, and a lot easier to manage. But the word easy and colour correction are still two words you should not use in the same sentence. Colour correction has got a lot of different aspects to it, and I will look into some of these aspects here.


DaVinci Resolve is one of the most in-depth programmes used for colour correction and grading. It works by allowing the user to grade the footage in different layers also known as nodes. Nodes are like layers in Photoshop, and you apply a layer after the previous one, or in between the shots depending on what kind of picture you are trying to achieve. The different types of layers allow separation of different aspects of the image for cleaning up and detailed tweaking.
Through nodes, it is possible to create a natural looking image, before it undergoes intense colour grading. Fixing whitebalance is usually one of the first steps to correct the image, and since it can be done on a seperate node, it is always possible to "go back" and make changes to this specific part of the image. DaVinci also allows the user to tweak the colour space for more detailed handling. This process will often secure better highlights and shadows, since all channels are separated in the program.
One workflow I have found interesting is to separate the luma and the chroma channels in davinci resolve. When seperating these two aspects into seperate channels, it allows the user to clean up colour noise, without affecting the luma.
After the final lock of the picture in the NLE software, it is possible to import aaf, edx or even xml files into the project, and thereby round-trip from one program to the other. This creates flexibility in terms of colour grading, since it is always possible to return to resolve for later colour tweaking.
Subscribe to:
Comments (Atom)